linux的开源系统包括debian和ubuntu基本上两年就更新一个版本,之后会逐步停止更新,服务器用的LTS(长久支持版本)会维持数年后被关闭更新,但是与之相应的程序比如php,由于需要第三方提供更新,就可能无法维持长久的更新。

v88.cn In name of my son
一些习得的技术知识
linux的开源系统包括debian和ubuntu基本上两年就更新一个版本,之后会逐步停止更新,服务器用的LTS(长久支持版本)会维持数年后被关闭更新,但是与之相应的程序比如php,由于需要第三方提供更新,就可能无法维持长久的更新。
最近更新是发现mysql无法更新了,原因是gpg key过期。MySQL为社区版本的MySQL 运行自己的包存储库。它们支持yum和apt包管理器,由子目录分隔。到目前为止一切顺利,但似乎之前的 GPG(用于签署包)已被替换。这会在运行apt-get update(或 apt update)时导致错误
查看存储库时,无法识别特定的 APT gpg 密钥。这些文件通常以 .gpg、.gnupg、.key 或类似的后缀结尾。但是,在存储库的顶级目录中还有一个有趣的文件:RPM-GPG-KEY-mysql-2022。
为什么耐人寻味?因为文件以 RPM 开头,建议这个键只用于 rpm 包(用于 yum 包管理器)。让我们使用 apt-key 导入该文件:
curl -s http://repo.mysql.com/RPM-GPG-KEY-mysql-2022 | apt-key add -
接下来运行apt update 就可以发现可以正常更新了。

很久未有更新,在此深刻道歉!
最近一年多来世界上发生了太多事情,大家都不易。covid19影响在持续,战火依旧在燃烧。关于电脑互联网以及coding方面,也有不少事情发生。win11已经逐步占据主流,微软也会停止win10的支持。关于老旧电脑由于硬件限制只有近2年的电脑才可自动升级成功,但不是说旧电脑不可能升级(太差的还是不要升级了,转不动)。更新到win11的办法我会抽空写一下,不过win10继续用也没多大问题。关于linux vps搭建方面,今天简单分享一下。
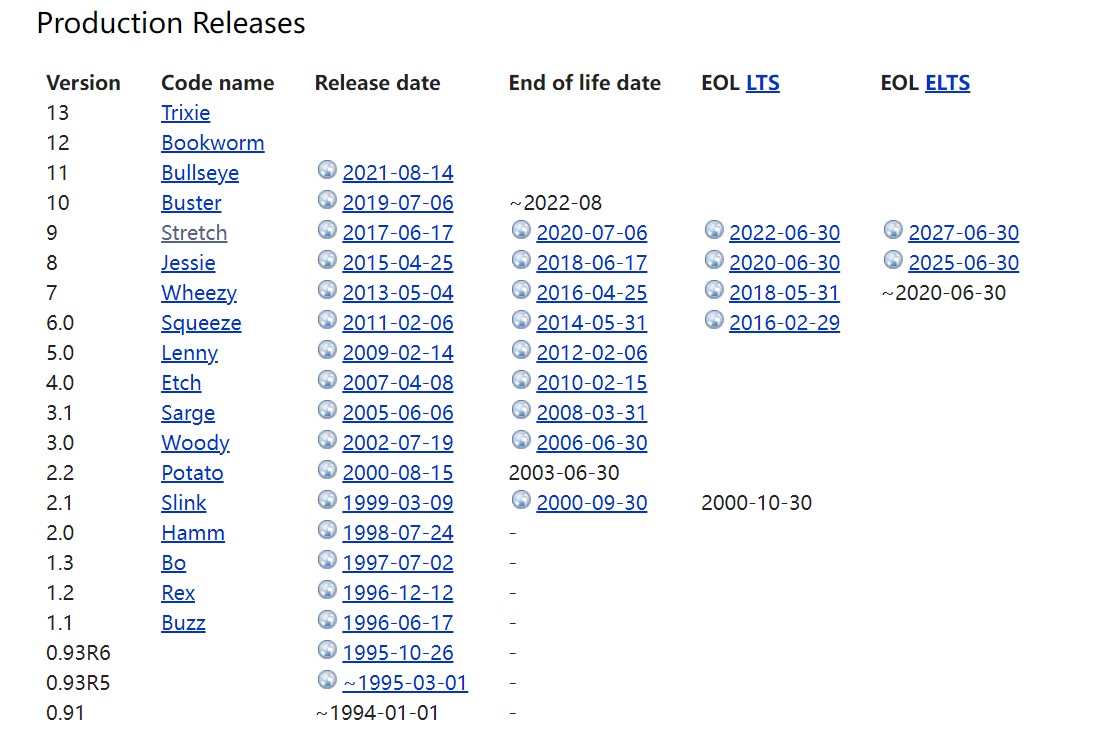
debian是我最喜欢的linux系统,作为外行的我来看,一是debian比较精炼,二是功能足够。debian11已经发布,替代了短命的debian10(据说bug多)。那么在debian11上搭建常用的服务器环境如何install呢
继续阅读“debian11+caddy/nginx+php8.1”debian在今年8月已经发布了debian11,而很多主机的版本还是10.3,在更新是会提示找不到源无法更新,可以修改/ect/apt/source.list里面的源地址来继续更新。(这里是阿里云的源)
deb http://mirrors.aliyun.com/debian/ buster main non-free contrib
deb-src http://mirrors.aliyun.com/debian/ buster main non-free contrib
deb http://mirrors.aliyun.com/debian-security buster/updates main
deb-src http://mirrors.aliyun.com/debian-security buster/updates main
deb http://mirrors.aliyun.com/debian/ buster-updates main non-free contrib
deb-src http://mirrors.aliyun.com/debian/ buster-updates main non-free contrib
deb http://mirrors.aliyun.com/debian/ buster-backports main non-free contrib
deb-src http://mirrors.aliyun.com/debian/ buster-backports main non-free contrib
除了系统,PHP,mariadb这些程序在使用一段时间后也可能会出现过期无法更新的问题。需要使用apt-key来更新OpenPGP key. apt-key的选项有:
apt-key add <file>          - add the key contained in <file> ('-' for stdin)
  apt-key del <keyid>         - remove the key <keyid>
  apt-key export <keyid>      - output the key <keyid>
  apt-key exportall           - output all trusted keys
  apt-key update              - update keys using the keyring package
  apt-key net-update          - update keys using the network
  apt-key list                - list keys
  apt-key finger              - list fingerprints
  apt-key adv                 - pass advanced options to gpg (download key)
首先需要在官网上去下载最新的GPG文件,再用上面这些来添加进souce.list里面。mariaDB最新的版本是10.7 ,在这里下载更新。
关于key失效也可以看这里。关于dirmngr文件夹找不到,可以看这里。debian上的PHP版本更新看这里,包括GPG文件。
最近再次搬迁博客,成功的在caddy2上运行了wordpress程序。在此记录下遇到的问题和解决办法。
继续阅读“caddy2运行wordpress”caddy2与caddy1相比在语法上有一些更新变化,不了解的话,写的caddyfile是无法让服务器跑起来的。
继续阅读“caddy2语法更新”最近半年多对caddy这个小巧的服务器有点入迷,可是caddy2推出时有点搞不懂,现在caddy2已经发展到ver2.11了,官方也是主推caddy2,折腾了一段时间总算成功运行了。这里也不想写什么教程了,就总结下肤浅的经验体会吧!
继续阅读“caddy2”吃灰的主机最近又折腾了一下。
php已经更新到7.4版本了,caddy也发布了2.0的beta版本ver 15,具体的进化没去探究了,似乎json文件出现的多了,api替代conf来控制server了?搞不懂
继续阅读“php7和caddy2”shadowsocks作为扶墙利器经过GFW的封杀和墙国的打压,一些作者已经停止维护开发,有的删除了github上的项目。目前SS仍然使用最多的匿名VPN之一,但shadowsocks各个版本中只有SS-libev还保持着更新。
继续阅读“SS-Libev和熵”最近发现caddy真是强大好用啊!只有20M的单个文件就可以实现非常多的HTTP功能
当然啦,在墙国最爱的就是反向代理了!Nginx虽然强壮但是反向代理google还需要安装一些模块,而caddy自带proxy功能,你所需的只是caddyfile里面加一句代码~!
https://mydoamin.com
{
 gzip
tls /root/xxx.crt /root/xxx.key
proxy / https://www.google.com
}